The single biggest audio upgrade most new podcasters can make is choosing the right podcast microphone. Your audience will tolerate mediocre editing and simple production values, but poor audio quality causes listeners to stop within the first few minutes and not return. A quality microphone for podcast recording does not need to be expensive—but it does need to match your recording environment, your technical setup, and the way you actually work. This guide walks through the key decisions so you can choose the right podcast microphones for your specific situation.
Whether you’re comparing USB mics for podcast recording at home or evaluating XLR options for a studio setup, the principles are the same. Understanding pickup patterns, frequency response, and connection types lets you filter the options quickly and find a microphone podcast setup that works the first time.
Why Your Podcast Microphone Choice Matters
A podcast microphone is not interchangeable with a webcam mic or a smartphone recording setup. Dedicated podcast microphones are designed to capture vocal frequencies clearly, reject background noise, and handle the proximity effect—the bass boost that occurs when you’re close to a microphone—without distorting. Consumer audio devices optimize for speech intelligibility in video calls, which is different from the warmth and presence that make a podcast enjoyable to listen to for an hour.
Your recording environment matters too. A small, reflective room needs a microphone with a tighter pickup pattern to minimize room echo. A well-treated space can handle more sensitive microphones that capture a wider field. Matching your microphone for podcast use to your actual recording space is more important than buying the most expensive model on the market.
Types of Podcast Microphones Explained
Most podcast microphones fall into two transducer categories and two connection types. Understanding these before you shop eliminates confusion about why similarly priced microphones perform very differently in practice.
Dynamic vs. Condenser Microphones
Dynamic microphones use a moving coil to convert sound waves into electrical signals. They’re less sensitive, which makes them better for noisy environments—home offices, rooms with HVAC noise, spaces without acoustic treatment. Condenser microphones use a capacitor-based design that captures more detail and nuance, but they also pick up more background noise. For beginners recording in untreated rooms, a dynamic microphone is the safer choice. For podcasters in quiet, treated spaces who want maximum vocal richness, a condenser delivers better results.
USB vs. XLR Connections
USB mics for podcast recording connect directly to a computer and require no additional equipment. They’re ideal for beginners and solo shows. XLR microphones connect through an audio interface or mixer, which adds cost and complexity but gives you more control over gain, equalization, and multiple inputs for co-hosted shows. If you’re recording with a guest in the same room, you need two separate inputs—which means XLR and an interface. For solo shows recorded at a desk, USB podcast microphones are a practical, high-quality option.
Polar Patterns and Room Acoustics A cardioid polar pattern picks up sound from the front while rejecting sound from the sides and rear. This is the most common pattern for podcast use because it focuses on your voice and reduces room noise. Supercardioid and hypercardioid patterns are even more directional. Omnidirectional patterns pick up sound from all directions—useful for roundtable discussions but problematic in noisy rooms. Check the polar pattern specification before purchasing any podcast microphone, and match it to your recording situation.
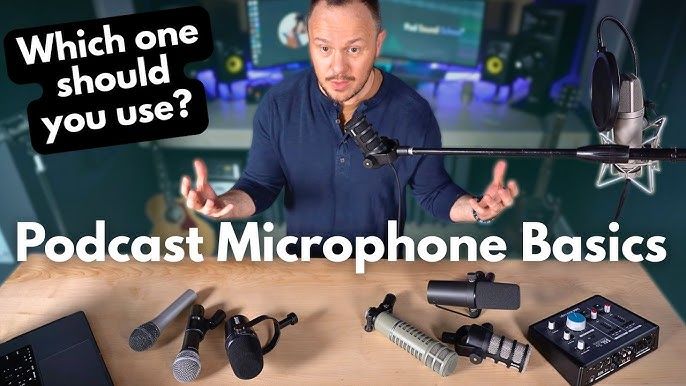
Best Microphone for Podcast Recording: Top Picks by Budget
Entry-level USB podcast microphones in the $50 to $100 range—such as the Audio-Technica ATR2100x-USB or the Samson Q2U—use dynamic capsules and work well for home recording without acoustic treatment. Mid-range options in the $100 to $200 range, including the Shure MV7 and the Rode PodMic, offer better build quality, improved low-end response, and more professional sound out of the box. High-end podcast microphones above $200—the Electro-Voice RE20, the Shure SM7B—are studio staples used in professional broadcast and podcast production worldwide.
The best microphone for podcast recording is not always the most expensive one. A $100 dynamic USB microphone in a quiet room with good mic placement will outperform a $300 condenser in a reverberant untreated room. Invest in your recording environment before investing in the most expensive microphone on the market.
Mics for Podcast: What Features to Prioritize
When comparing mics for podcast recording, several specifications matter more than brand name or price point.
Frequency Response and Sensitivity A flat frequency response between 80 Hz and 15 kHz captures the full range of the human voice without artificial coloration. Many podcast microphones apply a subtle presence boost around 5 kHz to add clarity to speech—this is a useful characteristic for vocal recording. Sensitivity measures how efficiently the microphone converts sound into an electrical signal. Higher sensitivity condenser microphones pick up more detail; lower sensitivity dynamic microphones require closer positioning but reject more room noise.
Build Quality and Stand Compatibility
A podcast microphone is a piece of equipment you’ll use hundreds of times. Metal construction outlasts plastic in daily use. Check whether the microphone ships with a shock mount—a suspension system that isolates the capsule from vibrations transmitted through the desk—which significantly reduces handling noise and keyboard rumble. Boom arms attach to desk edges and let you position the microphone correctly without taking up desk space. Verify that your chosen microphone is compatible with standard boom arm thread sizes before purchasing.
Setting Up Your Microphone Podcast Station
A complete microphone podcast station includes the microphone, a boom arm or stand, a shock mount, a pop filter (which reduces plosive sounds from “p” and “b” consonants), and headphones for monitoring. USB microphones go directly into your computer; XLR microphones connect through an audio interface. Set gain so that your voice peaks between -12 dB and -6 dB in your recording software—this gives you headroom without introducing noise from excessive amplification.
Position the microphone 6 to 12 inches from your mouth at a slight angle rather than directly in front. This reduces breath noise and plosives while maintaining full vocal presence. Test your setup with a two-minute recording, listen back on headphones, and adjust positioning before your first full episode.
Next Steps
Start with a USB dynamic microphone if you’re new to podcasting and recording in an untreated space. Add a boom arm and shock mount immediately—these have more impact on recording quality than upgrading the microphone itself. Once you’ve recorded ten episodes and identified specific limitations in your current setup, you’ll have enough practical experience to make an informed decision about whether to upgrade the microphone, the interface, or the recording environment.